As a developer who frequently works with React, I have always relied on the Create React App command to quickly initialize a React application. Thus, configuring via webpack never seemed to be very useful to me. However, as I continue to grow in my career path, I realized that it’s vital to have a deeper understanding of how webpack can be used to create a React application, since the Create React App command automatically performs the configuration process.
What is Webpack?
Webpack is a module bundler that analyzes a project’s modules, optionally transforms any, and makes a dependency graph, resulting in at least one new bundle. It simply needs to know: the entry point of an application (the file which webpack uses to build a bundle), any optional transformations to be performed, and a location to place the bundle(s). With these concepts in mind, a React application can now be built from the ground up.
Why Use Webpack?
Webpack simplifies the management of a JavaScript project’s modules. Although most browsers today natively support modules, using webpack to compile them provides some extra benefits.
One benefit to using webpack is its support for loaders. Loaders allow webpack to handle types beyond JavaScript and JSON, allowing support for types such as CSS. Furthermore, they can also transform files before or while they are added to the bundle. For example, babel-loader transforms next-generation JavaScript syntax to universally-compatible syntax, allowing you to seamlessly use the latest JavaScript features.
Another benefit to using webpack is the ability to minify your project’s code. When building in production, webpack can remove any inessential elements from your code, such as whitespace and comments, significantly reducing the overall project size. If you opt to use modules through vanilla JavaScript alone, you lose out on benefits such as those specified above.
Initializing and Configuring Webpack
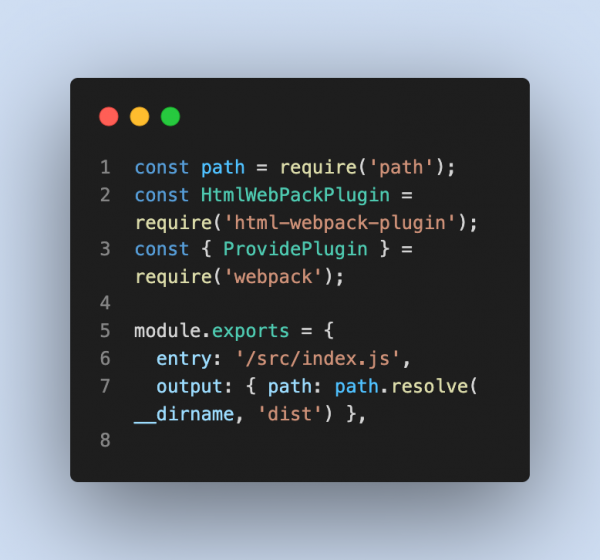
To configure webpack after initializing a JavaScript project through NPM (Node Package Manager), I installed three packages as dev dependencies: webpack (to bundle the application using webpack), webpack-cli (which exposes various optional commands on the command line to optimize the development process), and webpack-dev-server (which runs the application on a live-reloading server in development mode). In order to use React within any components, coupled with React DOM on the index.js file, I installed the corresponding react and react-dom dependencies. Next, I set up webpack.config.js, webpack’s configuration file.
The aforementioned concepts of webpack’s flow can now be applied when creating the webpack.config.js file. In this file, I defined and exported an object by assigning it to module.exports. In this object, I first defined an entry point (where webpack starts the bundling process) on the entry property, set to the src/index.js path. Next, I defined an output point (where the bundle(s) will be placed) on the output property, set to a sub-object with a path key and its value path.resolve(__dirname, 'dist'), placing the bundle(s) into an automatically-created dist directory.
Furthermore, the configuration file would also consist of loaders and plugins, two concepts essential to the bundling process.
Loaders
Webpack would need to be configured to support files beyond JavaScript and JSON, since it only supports those file types by default. It cannot just simply process CSS, or other file types, without the proper configurations in the config file. To address this issue, loaders would be used. Loaders are designed to bundle certain file types before or while bundling occurs.
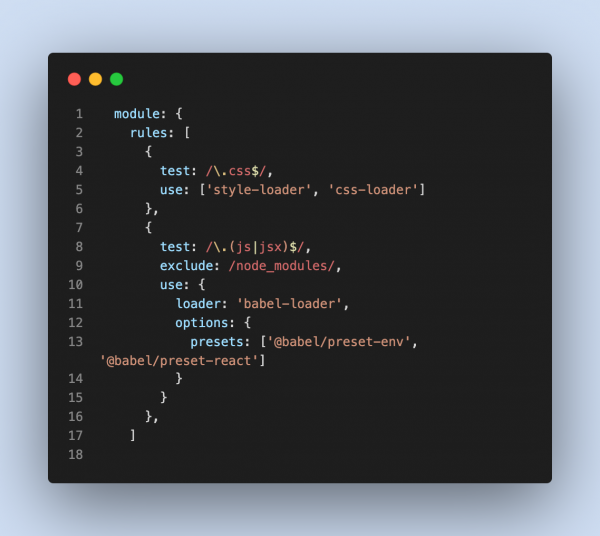
Since a React application is mainly written using JavaScript and JSX, along with some CSS, it’s important to specify the proper loaders to address this. In order to add loaders to the config file, a module sub-object must be added, containing a rules key, which holds an array of rule objects. Within a rule object, a few keys could be specified: test (which runs the loader on a matching file type), exclude (an optional key which excludes a specific file with a matching type), and use (which specifies a loader and any other configurations for the loader). To bundle CSS files, I defined a rule object. Inside its test property, I specified /\.css)$/ regex to match CSS types. Inside the use property, I provided an array of loaders, after installing them as dev dependencies: style-loader, which adds styles to the DOM, and css-loader, which accepts CSS file imports.
Any browser version must be able to interpret JSX syntax as JavaScript (since JSX is unique to React). To handle this scenario, it’s important to note that loaders can also act as transformers on any module. In this case, I configured Babel. By providing babel-loader, coupled with @babel/preset-env and @babel/preset-react presets, different browser versions could run a React application developed with JSX and the latest JavaScript syntax.
Plugins
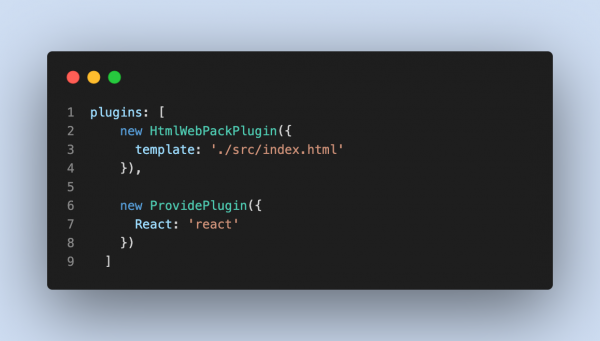
Finally, within the config file, plugins can also be specified. Plugins are similar to loaders. However, unlike loaders (which are invoked either before or while the bundle is created), plugins are invoked after the bundle has been generated. One important plugin that I used is HTMLwebpackPlugin. This can be used to automatically generate an HTML file containing script tags to the bundle(s); it can also be provided with an existing file to which the script tags are automatically inserted. I simply provided an existing index.html file, since it’s relatively simple and empty (before anything gets mounted to the DOM).
Production vs. Development Mode
Webpack supports both production and development modes. As their names would suggest, development mode is reserved for development, while production mode is reserved for production. While both modes provide the option of source mapping (simplifying debugging and error tracking), development mode provides a few options to automatically compile code upon any changes. I opted to use webpack-dev-server, which runs the application on a live server, automatically rebuilding as changes in the codebase are saved.
With production mode, the goal is to optimize the bundle to be as lightweight as possible. In production mode, webpack achieves this by automatically minifying the project’s code, removing any whitespace, line breaks, or comments.
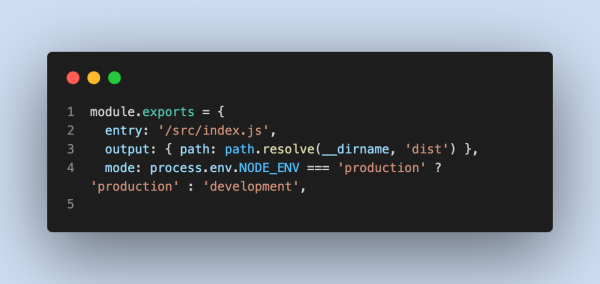
In order to run in either mode, I specified a mode property on the webpack config file, containing conditional logic (process.env.NODE_ENV === ‘production’ ? ‘production’: ‘development’) to determine the build mode, based on the value of the environment variable process.env.NODE_ENV.
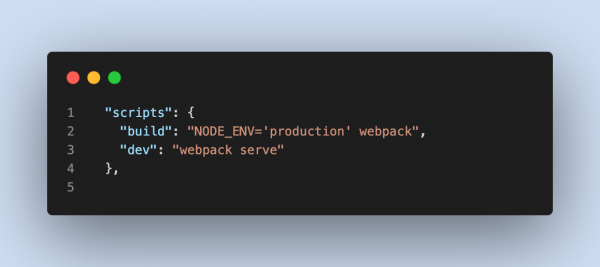
From package.json, I defined two scripts for building in production or development mode: build (set to NODE_ENV = ‘production’ webpack’) and dev (set to webpack serve, after installing webpack-dev-server as a developer dependency). If the build command is run, the environment variable gets set to production, allowing webpack to build in production mode. Otherwise, if dev is run, the environment variable is set to development mode and the development build runs on the live development server.

Conclusion
Although Create React App is commonly utilized for initializing a React application, it’s important to note how it works behind the scenes, since Create React App is essentially an abstraction of the webpack configuration process (automatically configuring the loaders and plugins necessary for a functional React application, such as Babel’s). Configuring webpack provides complete control over the development environment, while initializing with Create React App prevents any custom configuration by default. Because Create React App contains the necessary configurations, using it saves valuable development time and prevents possible configuration issues that may arise if webpack were used (such as installing babel-loader while forgetting to install @babel/preset-react).
I found setting up webpack and React to initially be somewhat difficult, due to webpack’s verbosity and relatively open-ended ecosystem. As I’ve explained throughout this article, setting up webpack involves the initialization of a configuration file and the installation of various loaders and plugins, along with specifying various subobjects and subarrays containing them. However, the configuration object’s properties and subobjects/subarrays follow a defined naming scheme (e.g. entry representing the entry point, output representing the output bundle location, and module containing an object with a rules array for each loader), making the configuration process easier to follow over time, as you continue to develop with webpack.
Overall, I believe that Create React App should satisfy most use cases, including those for larger projects. However, you may want to consider webpack if you need complete control over every aspect of the development environment.