Sitecore CLI Serialization (SCS) & Installation guide

Sitecore CLI Serialization (SCS) & Installation guide

What is serialization?

Serialization allows you to serialize an entire Sitecore database or a series of items in a database to text files. You can then use these text files to transfer this database or series of items to another database or Sitecore solution.

What is SCS?

Sitecore Content Serialization (SCS) is a system for serializing, sharing, and deploying content items, as well as keeping them in version control. Same like (TDS and Unicorn)

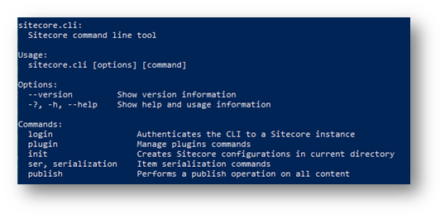
How to install Sitecore CLI in your project?

You must have .NET Core installed on your workstation before installing the Sitecore CLI. If you do not have the required version of .NET Core installed, you get the following message:

It was not possible to find any compatible framework version

The framework ‘Microsoft.NETCore.App’, version ‘<major.minor>’ was not found.

Also read: Solr Search Implementation And Performance Improvement Guide On Sitecore Based Website

  1. If you have not already done so, install Sitecore Management Services.
  2. Open a PowerShell with administrator privileges.
  3. Go to the project folder
  4. Run the following commands to install Sitecore CLI:
  5. dotnet new-tool manifest
  6. dotnet nuget add source -n Sitecore https://sitecore.myget.org/F/sc-packages/api/v3/index.json
  7. dotnet tool install Sitecore.CLI
  8. To initialize your new project, run the following command in your project folder:
    1. dotnet sitecore init
  9. Install the required Publishing and Serialization plugins:
    1. dotnet sitecore plugin add -n Sitecore.DevEx.Extensibility.Serialization
    1. dotnet sitecore plugin add -n Sitecore.DevEx.Extensibility.Publishing
  10. To verify that the Sitecore CLI works, go to your project folder in a terminal and type
    1. dotnet Sitecore
dotnet Sitecore
  • Login is required to pull and push data
  • login into sitecore and run this command
    • dotnet sitecore login –authority https://<Sitecore identity server> –cm http://<Sitecore instance> –allow-write true
    • once the above commond is hitted it will open login screen in browser
login screen in browser
  • Click on Yes, Allow
    • You will see login message in Powershell terminal as
login message in Powershell terminal
  1. Now create a file under your project folder Serialization.modules.json in my case and add the following details:
create a file under your project folder Serialization
  1. Run pull command to get serialize item from Sitecore
    1. dotnet sitecore ser pull
  2. Run push command to push data into Sitecore
    1. dotnet sitecore ser push

Also read: Save Custom MVC Forms Data Onto Sitecore Experience Forms Database

Save Custom MVC Forms Data Onto Sitecore
  1. List of all the command “https://doc.sitecore.com/en/developers/100/developer-tools/sitecore-command-line-interface-reference.html
  2. Install Sitecore for Visual Studio plugin
    1. Download Sitecore for Visual Studio.
    2. This is Paid Plugin and you need TDS classic license to use this.

Interested in our Digital Commerce Services?

Please enable JavaScript in your browser to complete this form.
Checkboxes
By submitting this form, you agree that you have read and understand Apexon’s Terms and Conditions. You can opt-out of communications at any time. We respect your privacy.